Tuesday, December 16, 2014

Saturday, December 6, 2014

Flower Arranging and Painting

Buy Here

Daily Paintworks offers a Buy Here Button that you can put under your paintings.  I can't figure out how to use it.  It comes up as a link, but not a button.  It shows up on the side bar, but I don't think it is supposed to be there.  Does anyone know how to do this?  If you do, please tell me. 

The painting is from a class that I was lucky enough to take about flower arranging from a very talented person, Jane Guerin,  in Fredericksburg.  She has a wonderful website and does arrangements for weddings and events.   I will include the link.  If it weren't for painting this is what I would want to do.  The one she did was lovely, its on her facebook page.

Link to Jane's website: http://www.janeguerinflowers.com/

Thursday, November 20, 2014

The value of doing the same painting more than one time

November 20, 2014


Here is a photo that I took while driving on Princess Anne Street.  (not a recommended way to take photos)  I've always liked this view.  I did a 6x8 study which I thought might work in a larger size so I painted one that started with a white canvas and the other trying a new technique for me of using black for the drawing layer instead of burnt sienna or transparent red oxide.   The reason for using black is that I have been studying the work of Ken Auster and bought a DVD by him that I am waiting to receive.  His reason for using black is that it mixes with the following layer and introduces more grays into his colors. 

There is a great description of how Ken Auster starts his paintings and a summary of one of his workshops by Brian Buckrell on his blog.  He has an outstanding blog.  He is very generous in sharing what he has learned from different workshops.  His paintings are very beautiful, too, strong and dynamic.

http://brianbuckrell.blogspot.com/2012/09/weekend-with-masters-ken-auster-workshop.html


6 x 8
photo of location9x12 - white canvas

8x10 - started with black on toned canvas


 I'm glad I tried three different ways of doing this painting.  I learned something from each one and can't wait to receive my DVD about painting street scenes from Ken Auster, another artist who uses loose brush work and abstract shapes.  I like that look. 


Sunday, November 16, 2014

I have been working....

November 16, 2014

New things I have been working on lately....

Notecards

I'm not sure why I make these.  The only reasons I can think of are:

it is fun to try different color combination

I have so much acrylic paint and hot press paper

I like the way they look


As soon as I finish them, I will show a photo.  If anyone is interested in how to makes these please let me know and I will post a blog with the steps. 

WARNING:  They take a lot of time and a lot of steps


COSTCO BOWS

I have been waiting for Costco to bring these out for the holidays.  There are 50 bows for 7 or 8 dollars.  So far  I have painted only three.  I was going to paint each one, but have scaled back to one of each color.  I recommend this because it is a great way to paint reflections and good practice for drawing. 


(will be at Heather Boutique once they are dried and framed)


Monday, November 10, 2014

Business Part of Art

Marketing


  I have had to accept that there has to be the ingredient of marketing in art, not a class that I took in college or anywhere so learning from the internet, blogs and the generosity of other artists has been my path. 

30 Marketing Ideas in 30 Days by Leslie Saeta jump started me into learning about the subject.  I recently found this online class called ART Biz Blog and that was through the advice of another artist.  There is an assignment at the end of each short video.  I'll add the links in the next 6 blogs. 

The first video talked about having a discipline of creating art.  The point was that you have to have a product to market.  The assignment was put up a sign with your studio hours and make the commitment to spend time creating art in your studio.    (pretty good hours....)


Check out this blog for marketing ideas and short videos  http://www.artbizcoach.com/


Daily Paintworks Website - a great motivator to paint everyday and see your progress.

Sunday, November 9, 2014

Painting Glass

Painting Glass
November 7, 2014


This is a good place to write everything I have learned about painting glass.   Joe Anna Arnett's workshop was very helpful with this.   I'll picture some of the paintings I've done that show glass.  I was looking at Carol Camichael's Blog that shows a good photo of glass. 

Here the link to her blog:  http://www.carolcarmichaelpaints.com/2014/10/for-friend.html

It really shows how she painted what is in the glass and the highlights.  Nice one!

1.  PAINT FROM LIFE.  The highlights show up best this way.  Much better than a photo would show the highlights.  Use a light shining on the object and be sure no other lights in the room make highlights that could cause confusion.

1.  Paint what is in the glass or behind the glass.  It takes some careful observation because sometimes things are distorted especially the background.

3.  The waterline has a highlight at the edge with a darker value next to it  (under the water line).   If you are painting flowers with leaves and stems they go into the flat surface of the water and with distortion look like they are coming out in a little different place.  The flat surface of the water reflects what is about it. 

4.  There is usually a highlight at the front edge (top and bottom) which comes out the other side of the glass.  Also, look for a highlight where the light hits the object usually towards the middle. 

5.  The color of the contents of the glass usually reflect strongly on the flat surface.  Carol Michael's painting shows that well. 

It' all about the highlights......    I haven't mastered it yet, but keep trying. 


Thursday, November 6, 2014

Angus Wilson Studio: 'Additions and changes' or 'Is it ever really fi...

November 6, 2014


Wow, this is so true.  I have done this quite a few times.  For me it is taking an abstract painting and painting another painting on top of it. 


I love this artists use of color and shape.  His blog came to my attention through a newsletter that I subscribe to called Brush Buzz.  They have a lot of info about marketing, too.  Just google Brush Buzz. 


Angus Wilson Studio: 'Additions and changes' or 'Is it ever really fi...: Campanula and jug on long table 20X47.5       Acrylic on wood Is it ever really finished?... Well in this case I'd have to say ye...


Like this painting that started as an abstract painting.  It still is an abstract painting in a lot of ways.  I even called it Abstract Tulips.

sold

Tuesday, November 4, 2014

Show at Water Street Studio

November 4, 2014
 
My last blog was about getting ready for a show.  I had a newsletter ready to go out, but Lynette Reed of Water Street Studio made this poster which I like much better than my newsletter so I emailed this to those on my email list. 
 
Thank you, Lynette, for making this poster.  You are so good at this.
 
Hope to see you on Friday for the reception.  John hung everything yesterday.  There is even a picture of him on the Water Street Studio website.  Thank you to John for doing this.  He does this like only an engineer can.  (I am the one slouched in a chair drinking coffee and watching John do all the work.)
 
Link to Water Street Studio.  They represent many artists and have so many items that would make great Christmas gifts. 
 
Thank you to Elizabeth, Lynette and Susan for inviting me to have a show. 


Monday, October 20, 2014

Getting ready for a show....

Show at Water Street Studio, 915A Sophia Street, Fredericksburg, VA - November 2014


(Bistro and La Pettit on William Street)
 
I am having a show at Water Street Studio thanks to Lynette, Elizabeth and Susie. Having a show has motivated me even more to have a group of work ready that has some kind of theme.  It is the best motivator around for painting and painting.  My theme is Fredericksburg with 9 paintings from Fredericksburg. There will be 15 - 20 paintings. 

(Caroline County, not too far from Fredericksburg).


Checklist for getting ready for a show

1.   


Order frames ahead of time and allow time for framing. (My husband does all the framing.  I am so lucky.  He is a perfectionist and does a beautiful job.)

Franken Frames and King of Frames have been my resources for ordering frames.  You can get custom sizes from both.  I am very happy with the quality of the frames, the attentive service, delivery and packing.  I recommend both.

Here are links to their websites:

http://www.frankenframes.com/frames_ccs.php?Item_Current_Specials=1

and

http://www.kingofframe.com/

If you have any questions about which frames I order just email me:  cbjmail@cox.net

My planning wasn't that great because I had to make three different orders. 

2. 

Order cards:

I used Moo.com  and ordered square business cards that allow a photo on front and back of card plus room for contact info and websites.  I've ordered from them before and really like them. 

http://us.moo.com/products/business-cards.html?utm_medium=cpc&utm_source=bing&utm_campaign=BS_US_Brand_Core_E_MOO.com&utm_term=moo.com


3.
  Do some publicity:

A newsletter and facebook are good way to advertise the where and when of a show.  I'll send out a newsletter at the beginning of November. 


4.
Write Artist Statement/Biography and Inventory

This is always hard to do, but I managed to write one.  I listed  my inventory for the show using excel spreadsheet. Most galleries require both of these things. 
 
I think I am ready now. 

Thursday, October 16, 2014

Geraniums

Window Box

For some reason I like painting window boxes.  My neighbor always has the most beautiful window boxes with great colors and she arranges them so nicely.  Every year they are a surprise because she changes the color schemes. 

Here is the photo and the painting.  My emphasis was on keeping the brushwork loose and using warm and cool colors in the flowers and leaves.  I used a pink underpainting to help keep the flower colors bright.  Then blocked in the big shapes before putting on the last layer of brushwork. 


Sunday, October 12, 2014

Study the work of other artists


Artist to Admire


Carol Carmichael  is another artist to admire.  Check out her work at her blog and at Daily Paintworks.  She has over 700 paintings listed with lovely brushwork.    She very generously shared what she learned about an artist she admires named Nancy Franke, someone  I would like to take a workshop from, too.  Click on her name here which will take you to her blog. 

Keep painting.  Mine from yesterday shown here.  (very loose brushwork)

Saturday, October 11, 2014

Updates and a few changes

October 11, 2014

The main purpose of my blog is to include lessons that could help someone learn from my mistakes, especially those things that have taken me long to learn.  There are also summarized notes from the workshops that I have taken.   I was looking over the lessons that I put on pinterest and noticed that some didn't link to the right page on my blog.  I think that is fixed now.

I also put the search button at the top of the right column.  The tab is still at the top of the blog page that includes the same lessons that are on pinterest.  I thought pinterest would be a good way to organize lessons in one place.  That button has been moved to the top of the right column, too. 

Here is a link to pinterest:  http://www.pinterest.com/josefiak/painting-lessons/


Hannah's Shoes


Thursday, October 9, 2014

Another Pumpkin Painting

October  --- Fall colors and Pumpkins


My husband and I discovered Braehead Farm in Fredericksburg, Virginia.  Their Fall Festival is going on right now and the pumpkin patches are perfect for picking. .  It is a great place for children and adults.  Their homemade pies are so good that we ate the one (strawberry and rhubarb) we bought before I could even do a painting of it.  I did do a painting of the pumpkin patch closest to the entrance. 


10 x 10 - Pumpkin Patch at Braehead Farm

Friday, October 3, 2014

Best in Show Award

Uniquely Stafford

It was a big honor that my painting of "Melcher's  Neighbor" was chosen for this award.  In the photo you can see how happy I look.  I've never received a "Best in Show" award.  My heart started racing when I heard my name.  It was very exciting. 

The house is located near the entrance to Belmont.  I painted it several times before because it just grabbed me.  Getting ready for the show it was the first place we went to take photos.  I have some attachment to the house.  It was build in 1881 even before Gari Melchers lived there.  Belmont is one of my favorite places, too. 

Thursday, October 2, 2014

Photos as a reference

Use of Photos to Design Your Painting

Thinking back to my workshop with Nancy Tankersley who emphasized the use photos to design the painting rather than making the painting look like the photo,  I made a lot of changes to this photo for the painting.  The two main ways it has been changed is moving the pumpkins around and changing the light.  I don't like to have the shadows in front with backlighting. 

So here is the photo and the final painting...  (a lot of cropping going on - thank goodness for the zoom feature on my ipad)


I might do a bigger painting of this because I like the way the purple and orange look together. 

Monday, September 29, 2014

Paintings for September

 
Paintings for September 2014
 
I've been painting bigger paintings this month getting ready for a show in November.  I'll list the sizes on the archive page.  Below is a collage made from "ipiccy" which is an editing program that is fun to use for making collages.  There are still quite a few of the 6 x 6's.  I didn't make the 30 in 30 this time, more like 16 in 30. 


My goal is still to learn something new everyday and keep painting. 

Sunday, September 7, 2014

Use of Photos in Paintings

 
Photos for Paintings
 
This is probably an example of the type of photo NOT to use for a painting.  
 
First, is was taken while speeding along the road.  I don't think we could even slow down.   Second,  even with zoom feature, it was hard to see.  You could argue that this photo prevent you from doing too much detail.  You can see why I used the blue-green background. 
 
Anyway, if I can get a photo of a cow or a sheep, I try my best to do it. 


I used this painting for my 30 in 30 challenge.  So many artists signed up for it this year.  Here is a link to the website.  http://lesliesaeta.blogspot.com/

I am  already two days behind. 

Wednesday, September 3, 2014

Edges - continued

Edges - continued

I meant to include these photos in my last post on edges. Carolyn Anderson talked about edges in her interview on AMO blog radio.  She mentioned something that I had to try which was to paint outside of the edge or inside of the edge not up to the edge.  Of course, I had to try out this approach.  If you google to her website  you will see Carolyn's lovely work. 

She suggested doing the drawing like a charcoal drawing, but using a wash which I thought was a good way of looking at the start, using shapes, rather than lines. 

 
When I apply something new,  I go back to basic shapes. 
 
There is some heavy paint done with a palette knife. 

Tuesday, September 2, 2014

Baby Gifts

Idea for Baby Gifts

I think these little paintings would make nice shower gifts for babies.  The main reason is that art is so lasting.  I am hoping that the children who receive the paintings will hold onto to these memories from childhood.  I like to imagine that a little painting like this will become a treasure later in life.  Maybe I am too sentimental about this. So that is why I paint things like baby dresses, baby shoes, gift boxes, rubber duckies and I hope to come up with other ideas. 

It reminds me of a friend's idea of giving her granddaughter a painting every year that reflects her age.  It must be getting tough now that her granddaughter is in kindergarten. 

 "It's a Boy"


"It's a Girl"
 
 
( I'll take these to Heather Boutique as soon as they are dry).

One more thing, I think it is a good idea to paint a subject many times because you learn something new every time, plus you are more willing to try something new each time. 

Awhile ago I started a board on pinterest with other ideas for baby gifts.  Click here to see it.

Saturday, August 30, 2014

Edges and Brushwork

August 29, 2014

Edges and Big Brushwork - the two things I am always working to improve......

Blog radio featured an entire show on "Edges" interviewing Carolyn Anderson.  I've been studying a lot of different artists lately to learn more about what takes paintings to that higher level.  Edges are a big part of that especially according to David Leffel who says they are "the soul of a painting"

Click here to get to AMO blog talk radio

Ann Blair Brown, someone I admire tremendously, just wrote on her blog some good exercises about achieving the brushwork that I like.  You paint three paintings.  In the first one, paint as you normally would, next cut that number in half, and finally cut the brushstrokes in half again.  Can't wait to try this.  She explains it much better that I can.  So here is link to her blog. 

Click here to get to Ann Blair Brown's blog.

My plan for the week is to continue to emphasize both brushwork and edges. 

This week I used a palette knife on this one to prevent myself from painting too tightly. 


Monday, August 25, 2014

Try something new....


One of the things I like about painting is that there is always something new to try.  I happened onto the blog of Karen Appleton and had to try what she explained about how to make transitions of color using thick paint.  So I had to try it for a couple of reasons. 

1 - I like the look of lots of paint
2. - This was a way of making thick paint look more exciting.


Color Transitions  with Thick Paint

Here is a link to the blog that caught my attention.  There is a good photo of an exercise she gave her students in a workshop. 


http://karenappleton.blogspot.com/search?updated-min=2013-01-01T00:00:00-08:00&updated-max=2014-01-01T00:00:00-08:00&max-results=14#.U_sq-DV0xaQ

(Blog post for October 2013 about workshop)

I tried it out in this painting:  (very thick paint - zoom in if you can)  It is done with a brush, not a palette knife.  I really laid the paint on thickly. 


Today I'm going to try this again with a box wrapped in polka dot paper.  The paper has happy memories for me because I used it to wrap a present for one of my granddaughters. 

Also, yesterday I took an old painting that I considered to be a flop and reworked with all this in mind.  I was surprised and happy with the results. 

It's all good practice to lead you to what you like best in a painting. 

Saturday, August 23, 2014

Workshop with Nancy Tankersley

Workshop with Nancy Tankersley in Easton, Maryland


I love Nancy's paintings and that made me want to take the workshop.  She opened up a new way of thinking about and using photos. 

Nancy's emphasis on using photos as tools and references hit home for me.  She uses the photos to help design the painting, not as something for copying.  Her use of notan and the use of value-viewer added to the useful information. 

The workshop was the perfect balance of demos, instruction, paint time and individual help.  It always takes me some time at home to incorporate new ideas, but you can tell I am glad that I took this workshop. 

Here are links to Nancy's website and info about workshops in Easton, Maryland, a beautiful place and not that far from Fredericksburg, VA.   Plus Nancy is having a show in September in Easton. 

http://nancytankersley.com/works


As time goes on I will add  more details about the workshop. I have to apply some of what I learned and go over my notes a few times. 

For now here are some of the paintings I worked on in class and the first one I did when I got home. 


In case you have never been to Fredericksburg, Virginia, this was on Facebook and a good look at our city.  It made me want to do more paintings for my "series".  I did an 11 x 14 of William Street in class, but here is the study for it. 

Fredericksburg, Va - Youtube


Monday, August 11, 2014

Color Mixing -Secondary Colors

Limited Palette - August 11, 2014


I like this new way of setting up my palette.  I even got a new palette and moved out some of my colors.  (I will still use all those great colors, but in a different way) 

What I like about this:

     Pre-mixing helps me
     Keeps my colors organized
     Can take better advantage of using warms and cools
     Can keep colors brighter
     Makes for a more harmonious painting
     Make gray out of limited colors which also helps with color harmony

 
I don't know if you can tell, but first I created primaries out of the warm and cool of each color, then I can utilize the warm and cool of each later when thinking about temperature changes in the painting.  Next I created the secondary colors and put them in the middle with tints of each radiating out to the edges.  Also, before starting, I made a pile of gray (top left) out of secondary colors just to insure that painting will be harmonious.  The reason the tints are there is because I try to mix with equal values when making a new mix. 


Start of painting with wash of dark gray
 
 
Refined drawing and strengthened darks.
Started adding color. (background is from the gray made earlier)

Finished painting

Used same palette for this painting and am painting one today of this scene with photo taken from a different direction.  By using the same palette, theoretically these painting should look good together, right?  I hope so. 

Thursday, August 7, 2014

Color Mixing

NOTE:  GIVE-AWAY

( I added an August give-away on the side bar - to enter email me to receive the newsletter that I haven't sent out for months.  I just needed some way of having entries and this idea seemed like a good one.  If you receive the newsletter already, just send me an email with subject line "give-away".  I'll send out a newletter in a month or two to mention my show at Water Street Studio. 


Color Mixing Secondaries - ORANGE       GREEN         PURPLE

Recently I posted a blog about tertiary colors.  This time I am experimenting with secondary colors.  It is a little tedious, but worth it do this kind of practice every once in awhile.  It helps you see another level of color this way.  I always learn something by trying a new combination of colors. 

First do a grid using orange, green and purple and do a value scale with each color by adding white. 

Then mix each secondary with the other two.  You will see some new colors to use.  I think you can get stuck in a rut by using the same colors.


My palette, with three secondaries in the middle to start out with, pre-mixing of tints, then mixing of various intensities. 


COLOR HARMONY

The most important result is how harmonious your paintings will be by restricting yourself to a limited number of colors.   On my palette I used only secondary colors for the painting shown here.  I organize my palette before starting.  I showed more examples of this on an older blog about primary colors. 

Photo used for painting:


Painting (study) done using only secondary colors.  Purple in the sky, green with orange for greenery, low intensity orange (purple added) for building, touched or orange for the path into the painting. 


Saturday, August 2, 2014

Taking Photos of Art

Wow, this was welcome information to me.  Thank you, Lynn, for sending this to me. 

Here is a link to "how to take photos of art"  on youtube.  It was very useful information.  I was so encouraged when I saw that the instructor used a little camera very similar to mine, not a giant and complicated camera that people who know what they are doing use. 

https://m.youtube.com/watch?v=Vpj28da03JQ&autoplay=1

Here is a photo I took using some of what I just learned.  I'm still investigating the "white balance" issue. 

I need to watch this before I take every photo of my art from now on until it is second nature. 

My first photo:
 
I looked at the video again and zoomed in with the camera feature rather than just getting close to the painting.   

This one looks closer to the actual color.  The first photo isn't as accurate in color because the background is more of an apricot color.  I see improvement though. 

Monday, July 21, 2014

Color Harmony - my version of the limited palette


July 21. 2014


I tried some new things this week.  One was starting on a white canvas and the other was a new way of organizing my palette.  I watched a video online at https://artistsnetwork.tv/ by a portrait painter, Joy Thomas, who used a limited palette and pre-mixed using mostly tints (colors mixed with white). 

Two of my students tried the pre-mixing with tints and I think they liked it. 

Organizing the colors not only made mixing a little easier, it also added harmony to the painting.


Joy Thomas (link to this painter's website)

My palette:  I have a lot of colors, but like the limited palette.   I just use these other values of each color to keep colors bright and because I must like to buy paint. 
 
Pre-mixing the tertiary colors that I used in the painting gave me a better chance to stick with the limited palette and create harmony.  I like this way of organizing before you start.  I've used this ever since I watched the video by Joy Thomas.  Sometimes I use only primaries.  I need to try secondary colors only. 


What my palette looked like at the end of the painting.  The colors look so nice together.  I still use my other colors, but mostly for brightening and knocking down the intensity when needed. 

The two painting side by side having used the same limited palette. 


The two paintings done with the same colors.  (The photos above look better)  The one with the phlox below is a little over-exposed and washed out.)  I still have not taken a class in how to take good photos. 

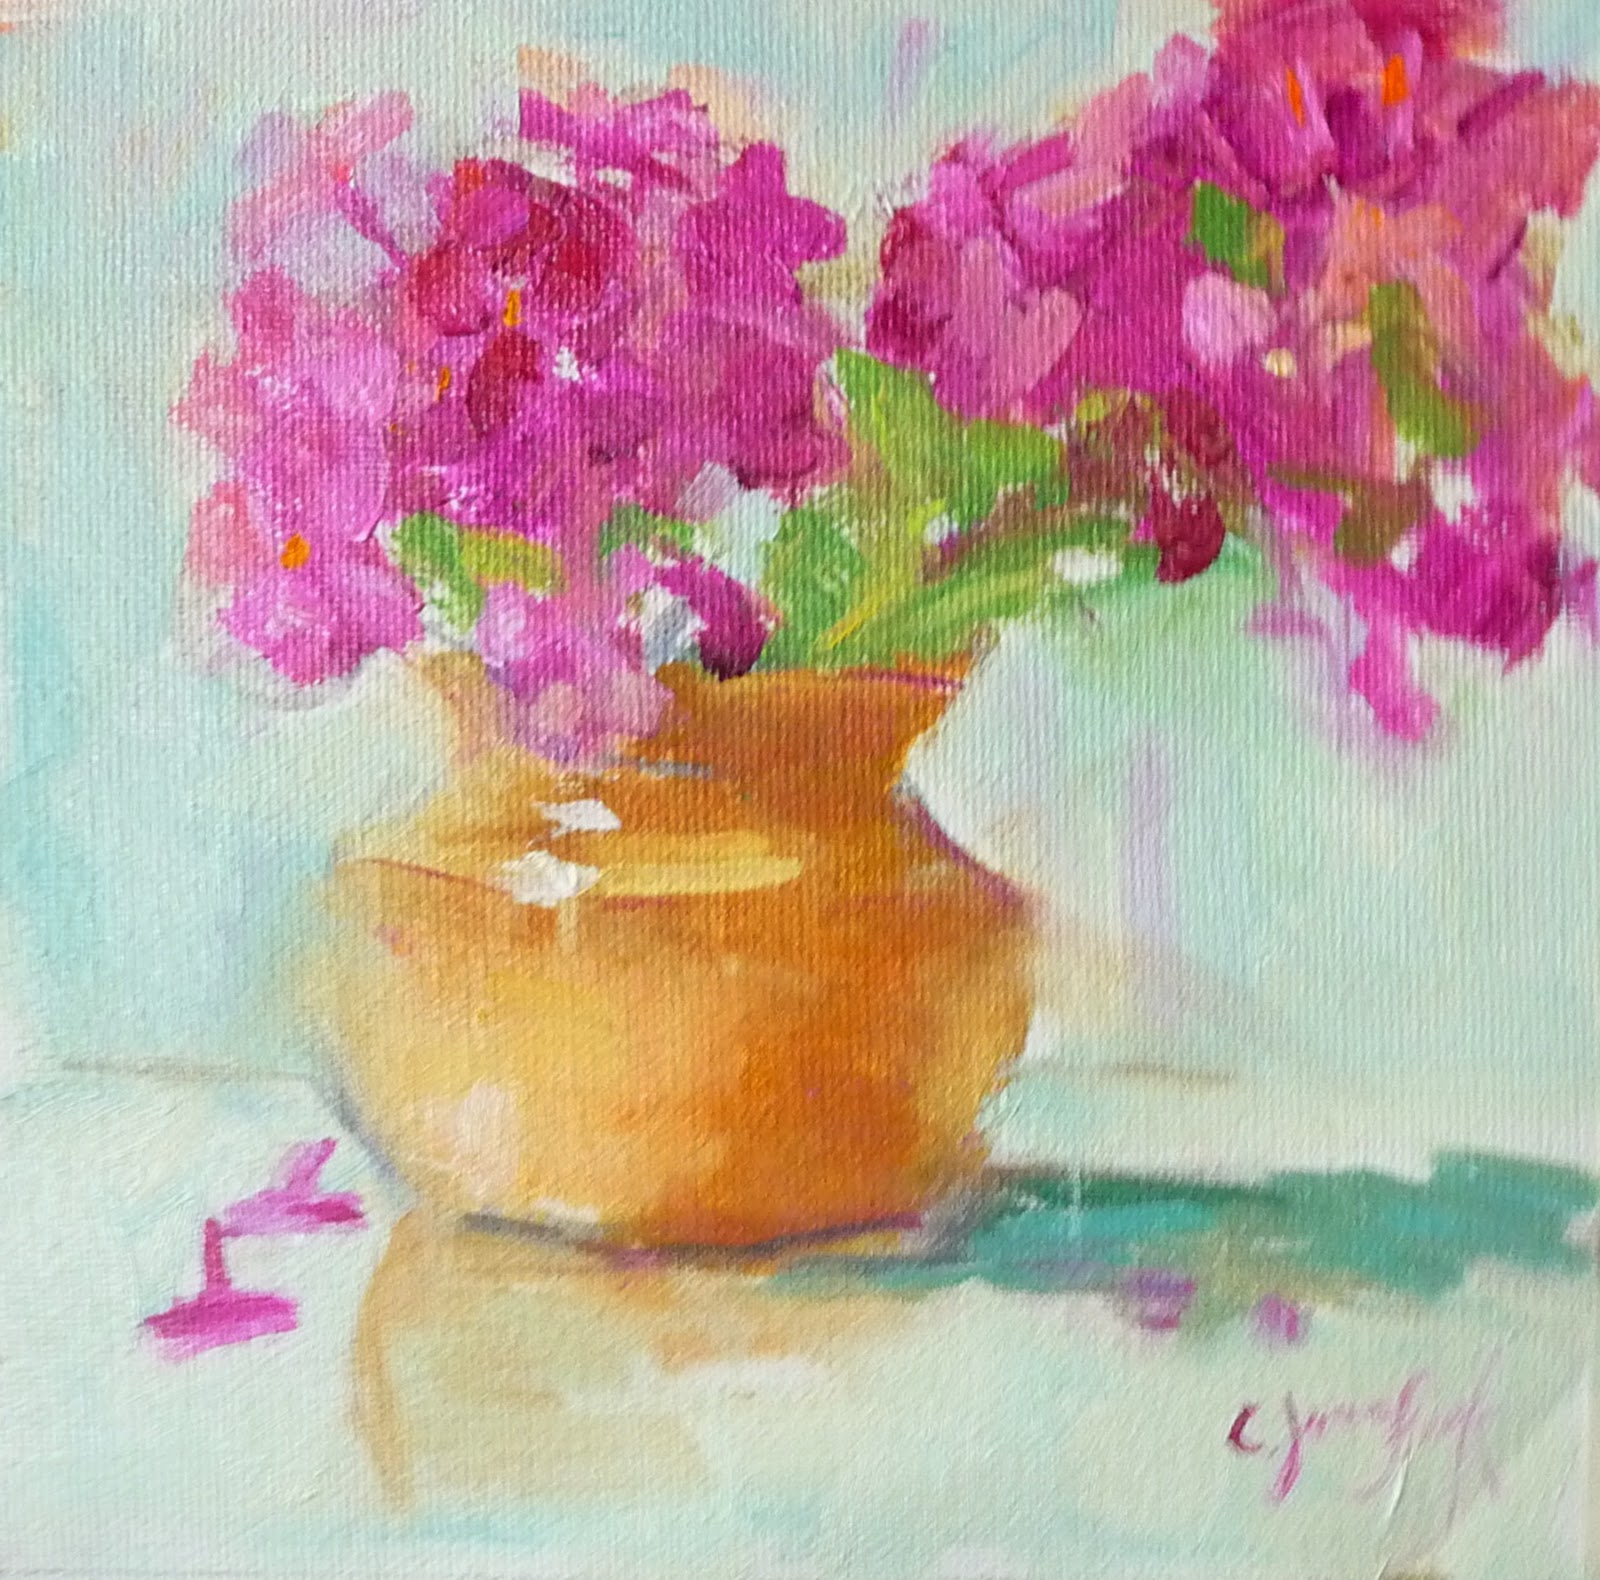
Color is vase is a dull YO, M in flowers, background is mostly BG
Vase is BG, flowers are YO and M is in background