Sunday, March 31, 2013

color boards

 
These are the colors boards that I talked about on an earlier post.  The idea is to make one for every color on your palette.  The first board is the basic palette, then each successive board starts with a different color from your palette until you have one board for each color.  The color is full strength on the top row, then tinted with white, (I used titanium).
 
Reasons for doing this:
 
Helped me become familiar with my colors and get to know them.
 
 
Helped me understand value
 
Helped with color mixing
 
Helped with using a brush  ( you can do these with a palette knife, too, then it helps with using a palette knife)
 
I'll post more of the boards in the next few days. 
 
If you have any questions, just e-mail me or use the comment box.  These helped me a lot and my students at least say they like them. 


Wednesday, March 27, 2013

I put a link here to connect to a good article about the painting a day movement.  Thank you to Brandon Newton for posting this on facebook.  I may have done something wrong in the way I posted this, but you could google it.  It is an interview with Duane Keiser in the Huffington Post. 
 
life is a balancing act
6 x 6
March 27, 2013
( I thought about naming it food pyramid) - maybe it could have two names
 
http://www.huffingtonpost.com/john-seed/duane-keiser-a-painting-a_b_2776043.html?fb_action_ids=629358683747201&fb_action_types=og.likes&fb_source=other_multiline&action_object_map=%7B%22629358683747201%22%3A132162270295948%7D&action_type_map=%7B%22629358683747201%22%3A%22og.likes%22%7D&action_ref_map=%5B%5D

Tuesday, March 26, 2013

I did this painting a couple of months ago. 


It did start out with the idea of painting birds.  Part way through I noticed the shape of one bird near a lightly painted line and the rest just happened. 
 
24 x 30


Sunday, March 24, 2013

Sometime I just like to mix colors........
 
 
Mixing Complementaries  - great grays
 
This chart was set up to show what happens when you mix complementary colors.
 
The first column of each set shows the full strength color at the top and bottom of the chart.  The second column shows what happens when you tint each color with white.  The third column was meant to show what happens when you mix an analogous color with the complementary sets.  I never finished that part, but you can see from the red, orange and blue that the color gets brighter.
 
 
Mixing complements does two things.
 
 
When adding just a little complement (2nd rows from top and bottom) the color gets darker and duller.  As your progress to the middle the mixes keep getting duller until the mix in the middle is gray.  You can get some great grays this way, warm ones, cool ones......
 
 
How to make a color darker
 
How to make a color duller
 
 
How to make a color lighter
 
 
How to make a color brighter  (besides adding the analogous color, either lighter or darker, you have to keep your brush really clean.  


Friday, March 22, 2013

Painting from yesterday, March 21


I'm getting behind on blog entries.  This painting was done yesterday from tea cups that my mother gave me long ago.  I never use them, but can't part with them so this is a good use for them.  My mother would like the idea that they are in a painting. 

Thursday, March 14, 2013

 
Painting for March 14, 2013
 
 
I am still working on turnips.  I like these colors together.  I would like to do another, but the turnips have reached the end of the line. 


Wednesday, March 13, 2013

Painting for today, March 13, 2013
 
 
6 x 6
Oil
 
I painted this from a photo that I took in the car on the way to Blacksburg, Virginia, to visit my son at VA Tech.    I like houses with red roofs.  I know it's not a good idea to use a photo taken while driving along, but I still do it. 


I constantly struggle with what to paint.  Sometimes I have endless ideas, other times, no ideas.  I do often paint the same thing several times in different sizes.  A lot of paintings intended to be framed end up being studies, but  I have always believed that you learn something from every painting and never consider even a failure to be a waste of time. 
 
Feel free to use any of these photos.  I still see things I would do differently in this one so I might do another one. 


This shows the major stages of a painting, starting with big shapes, then refining as you go along. 

Sunday, March 10, 2013

a balanced diet


20in x 11 in

I really like painting donuts for a lot of reasons.  In the past week I've eaten more donuts than in the last twenty years.  It is an endless subject and great reason to buy them.  I said the one with pink frosting was my last one, but maybe not.  The fourth one up is the one I was waiting for because it was filled with something white and fluffy.  I froze them in between painting times, but that one  was still good.  My husband will eat the rest of them.  (It took a lot to balance them,  they fell over a few times.)

Saturday, March 9, 2013

Thursday, March 7, 2013

Painting for March 7, 2013


  This is my study for  a big painting.  I'm undecided about the background color.  Having all these donuts around has been torture.  I might have to buy more so there is variety.  Pink with sprinkles will be the next layer.  Will they last until the painting is finished?


Wednesday, March 6, 2013


Painting for March 6, 2013


6 x 6


As soon as this dozen is gone and I have finished the big painting of donuts,  I am going to have to find a subject with fewer calories. 


Tuesday, March 5, 2013

March 5, 2013   - my painting for today - sold


6 x 6
Oil

We bought a dozen donuts today.  The only one I had to eat was the peanut one because it would have been  too hard to paint. 

Monday, March 4, 2013

March 4, 2013
 
Painting a Day (from one day last week)
 
I worked on a big painting today.  My last post shows the big painting, but mainly I wanted to show a photo of the shadow box that my husband made for me.  I am very lucky to have such a nice husband. 
 
 
6 x 6
Green apple with blue vase

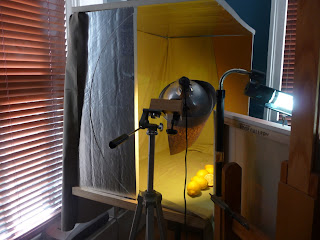
Shadow Box


Shadow Box that my husband made for me.  The sides are insulation board which is very lightweight, the base is mdf board and it is mounted on a Timber Tuff chain saw sharpener stand.  The reason we bought the stand is because it is sturdy, adjustable and reasonable in cost. If you have any questions,  just email me.  I am so happy with it.  It has really helped in isolating the light and getting rid of extra shadows. 


Yesterday's small painting was done from this set-up and today I am doing a big 18 x 36.  It's only partially completed. 

Sunday, March 3, 2013

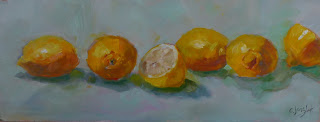
March 3, 20013
 
Painting a Day
 
I tried to put each lemon at a different angle.  Painting yellow is always a challenge.  My plan is to do a big painting from this, probably 18 x 36.  I'm not sure if it look right bigger than life


6 x 15 
Oil on board
These are frames that I just ordered from FRANKEN FRAMES.  I am very happy with them.  They are sort of modern looking and work well with the flat panels that I use for the 6 x 6 paintings a day. 
I was also pleased with the great communication they provided and the prompt service. 


Link to Franken Frames

Saturday, March 2, 2013

Painting a Day - March 2, 2013

 
I started this one yesterday and finished it today.  I guess it doesn't qualify for "Painting a Day"
 
12 x 16