Showing posts with label how to start a painting. Show all posts

Tuesday, February 16, 2016

How I start most of my paintings....

February 16, 2016

I start my paintings several different ways, sometimes even with a white canvas, but mostly doing a value study with burnt sienna or transparent red oxide.  I do a very loose drawing except for architecture or the center of interest.  Once the three value work is finished I go back and emphasize darks using a mix of Ultramarine blue and burnt sienna, my accent dark.  Plus I wipe out the lights with a paper towel and oms.

Step I


Step 2

Premix the colors used in the painting and try to follow my rule of having darks across the top of palette  (accent dark in top right corner), tints on the very bottom and middle values in the middle of the palette.  There is also attention to warms and cools.  I use these colors as a starting point and continue to mix for variety as I go.  That is why the palette looks so messy, but organized if that is possible. 


Step 3

Apply blocks of color all over.


 Step 4 - Finish color and refine shapes, check for edges,


Posted on Daily Paintworks.  8x10 - Snow Day  in Fredericksburg

Monday, March 23, 2015

How to start a painting

March 23, 2015 - Steps for a landscape painting

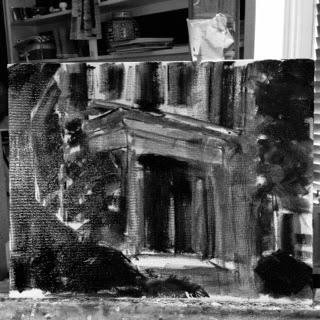
This is one way that I start landscape paintings  on a canvas first toned with Indian Yellow.  I usually take black and white photos as I go to be sure the dark (notan) is strong.

 Steps for a studio painting that I did from a photograph taken several years ago.  The wisteria on this porch against the color of the house looked beautiful.  The house is on Washington Ave. in Fredericksburg, Va.  It will be part of my Fredericksburg Series.   This painting is an 11 x 14. 


Step 1 - loose drawing, simplify big shapes
 
This photo shows the color of the toned canvas using Indian yellow.  The photo above was photographed in black and white. 


 Black and white photo of Step 2
 
Step 2 -  used dark color blocks of big simplified areas


Step 3, added opaque paint and more detail. 


I like this method because it helps maintain the darks.  Notice how the darks show through in the final painting (11x14)

Sunday, March 15, 2015

March 15, 2015 - Happy St. Patrick's Day


This show gave me some good ideas about blog writing.  Leslie Saeta interviewed Dreama Tolle Perry. 

Click here for radio show about 10 ways to write a better blog

Also, I need feedback, questions about topics that might interest you. Just write the questions in comments at the bottom of each post.   I was thinking about showing different ways to start a painting.    I start my own in different ways depending on the subject and how I want the painting to look in the end. 

This canvas  was toned with Indian yellow at the beginning, then I did my drawing with burnt sienna, both added to make the painting feel warm.


I used Rembrandt Transparent Red to tone the gessobord for this one because I want the geraniums to really sing.


Thursday, February 6, 2014

how to start a painting

February 6, 2014 - 4 stages of a painting - another way to start a painting

This is just one of the ways to start a painting.  I've used this exercise with students to show the stages of a painting.  It could be done loosely with more deliberate brushwork. 


lower left

1.  Start with a wash of Ultramarine Blue and Burnt Sienna or anything that gives you a dark gray/black.  Do a very loose drawing.  Wipe out the lights with a paper towel 

upper left

2.  Next paint large shapes of light and dark with color in the values you did in Step 1.

top right

3.  Start refining the shapes of light and dark, add the mid-tones for the reflected light and where light meets dark on the apple.

bottom right

4.  Refine even more, add the highlight, apply paint on background and foreground,  work on edges to include some sharp edges and soft edges.  Include some green in shadow.

The point of this exercise is to do the painting in layers.  It also helps to maintain the darks if they are established first. 


Thursday, January 30, 2014

Learn to Paint

January 30, 2014

Part of my reason for having a blog is to include lessons and exercises that will help someone learn to paint, but with blogs that information gets lost in the archives.  I was thinking that a "search button" on my blog would help with that problem.  I hate to admit this, but I  installed one awhile ago, but forgot that it was there.  I moved it to the top right of this page.  I checked it out and it really does work.

There are  lessons embedded in old archives. 

Search for:

value
color mixing
how to start a painting
demo
color boards
exercise
Temperature
Edges
painting loosely

 (other search words work, but I know these do)

The topics are on one of my pinterest boards, too.  (Click on "pinterest")


Emphasis on loose brushwork - listed on Daily Paintworks

(This reminds me of the wonderful pies my mother used to make.  The napkins belonged to my grandmother.  It is a very sentimental painting for me.    My daughter-in-law has tried to teach me to make pie crust.  She makes great pies, too, and so does my son.  I am better at eating pie. 

Friday, November 1, 2013

How to start a painting

#9
Four steps - one way to start a painting

  This is how I usually start my paintings.  I  set up the still life in my shadow box with the light coming from the left or right, just so there is a strong shadow side with a cast shadow.


One way to start a painting:

Step 1 - after toning the canvas with a wash of ultramarine blue, cad red light, and yellow in a neutral mix, the next step is to start drawing with the neutral mix.  Keep the drawing to shapes and values more than a line drawing. 

Bottom left is a value drawing of shadow, cast shadow, reflected light,  and light.  It's all about getting the values right. 

Step 2 - Top left - Translate the values to the equal color values, still very loose and thin paint.  At this point, still looking at the sill life is a good time to do any needed re-drawing. 

Step 3 - Top right - apply thicker paint, add mid value where the dark meets light and on the right side of the apple that reflects the light.  I start with the darks first. 

Step 4 - Bottom right - Finish the painting by refining details, adding thicker paint on the light side, adding the highlight,    The general idea is to work all over the painting including the background and foreground. 

There are lots of ways to start paintings.  This is just one. 


Thursday, October 31, 2013

How to start a painting

#8 - Toning the canvas

The last 7 posts have been about value and color mixing,  a good thing to have under your belt before starting a painting. 

There are many ways to start a painting.  I'll include some of the options, but mostly the way I start a painting. 

1 -  Toning the canvas is the first option and decision. 

Toning the canvas means applying a wash of odorless mineral spirits in the color of your choice.  It can also mean using a colored gesso or an acrylic color applied to the entire canvas. 

WHY:  You have a value, usually middle value, to help you get started with drawing onto the canvas.
 
(Top left) In this example the  choice was red, the complement of green, chosen because complements together are exciting and the green of the pears will vibrate against the red.  This was done with acrylic.
 
 
(Top Right) - started on a white canvas.  The end result will be a high key (high value) painting. 
 
 
(Bottom left) - This one was toned with a neutral wash of Ultramarine and Burnt Sienna (any mix of red, yellow, blue will give you a neutral)
 
Bottom Right - toned with a mix of cad light and yellow ochre
 
It all depends on how you want your painting to look in the end.  I've tried all of these, but the way I use most is the bottom left, using a neutral wash for the toning and the next step which is drawing onto the canvas. 
 
Tomorrow I'll include photos of the progression of a painting, starting with a drawing. 
 

Sunday, September 15, 2013

Painting Demo

Painting Demo  (click on Painting Demo to see video, I hope)

I tried using Animoto again for a demo.  The first time I did it with text  and I went over the limit for the free service.  I'll have to think about whether I want to spend the extra five dollars a month for the expanded version. 

Last time I did this a few people said they could see the video.  Only the words of the title shows up on the blog.

Here are the steps with photos, the old-fashioned way:

Step 1 -Tone the surface, I chose this warm color to reinforce some of the colors I would be using in the painting.  The gold color will make the yellows sing.


After I did the drawing, I wiped it off so the wash wouldn't mix with the next layer, something I learned from Carol Marine in here ArtByte on Daily Paintworks


Step 2 - Use a wash (paint thinned with OMS) of the shadow color, a dark grayed out version of the object's color. 


Paint the darks so they go outside the lines, it will help with creating soft edges later.
 
 
Step 3 - Start adding the lights and background.  The last steps of the painting include adding more detail, highlights, refining edges to include sharp ones at the focal point and soft one elsewhere.  I use the paints that I have used to mix the colors in the painting to create a neutral background.  At this point I think about including temperature variation within both the lights and darks.

(I forgot to take photos in these last steps.  It happens every time I plan a demo.  It must be because you get so carried away in the last steps of a painting.  Next time I will set a timer. 


Last step is to post this on Daily Paintworks and the 30 day Challenge. 
 
15 more days to go on the Challenge.